How to remotely record an interview or voiceover
More and more actors and producers will be turning to remote recordings as travel to recording studios become less feasible – and less necessary. Whether or not you are used to travelling to a professional recording studio, it’s always good practice for voiceover artists, podcasters and actors to have a basic home studio set up, as it is a huge advantage when pitching for voice work or being available for podcast interviews or radio promotion. So in this article we’ll look at a basic set up that will secure those voiceover jobs by recording high quality results from the comfort of your own home.
A History
Before the internet, remote recording was all about having a solid Integrated Service Digital Network connection. An ISDN line is a telephone-based network system that allowed actors and voiceover artists to make digital recordings over a phone line. It was perfect for a home studio set up when real-time recordings were required by broadcasters. By simply connecting to an ISDN line, the actor could transmit full bandwidth voice recordings that would be captured at the other end by a professional broadcast studio and instantly spun into a news item or advertisement.
However, using ISDN has become redundant since broadband became widely available worldwide. The ISDN system is being slowly phased out by telephone companies and will no longer be an option in 5 years time.
So now let’s look at the software options that have replaced ISDN as a viable remote recording system in the age of the internet.
Easily done. Voice apps are free!
Well, yes they are and many would turn to Skype or Messenger or one of the many audio/visual apps that dominate the mobile phone market. But the drawback is the quality of the sound. Realtime video apps have very poor sound quality, often giving the impression they were recorded underwater or in a wind tunnel! In real terms, these free apps are not a viable option and at best would be OK for a cheap podcast or to record a celebrity who wouldn’t have the technical know-how to produce anything better. We can safely strike free mobile phone apps off this list for the time being.
The best option is to pay a monthly fee (or reduced annual fee) for a good, dedicated app with technical backup. This outlay is nothing that can’t easily be recovered with one fairly well-paid voiceover job that you wouldn’t have otherwise been able to produce under current isolation circumstances.
So, what’s out there?
There are many, many remote recording apps, programs and software on the market.
Zencastr, for instance, has a free plan that allows 8 hours of mp3 recordings per month for up to 2 people. The full bandwidth wav file recording starts at $20 per month. Zencastr includes a browser soundbar feature so you can upload music, intros and ads. It has a post-production feature that adds noise reduction and adjusts levels to broadcast standards. It has the option of backing up files to DropBox, backup being an important feature when recording remotely.
Squadcast is another current hot contender. It’s run by a bunch of podcast enthusiasts who were frustrated by the quality of results when producing interviews from various locations around California and decided to set up their own system. It’s an efficient, effective way to record one, two or multiple voices (up to four) over the internet. Your voice is uploaded as it’s being recorded. And at the same time is automatically backed up. You get all the support you need from a team of highly skilled technicians. And all this for $17 per month. That gives you 5 hours of audio recordings. If you need more, there’s a Pro package for $38 per month for 12 hours recording. Or go for a starter pack at $9 per month. Indeed with 2 hours of recording, you could take the ‘Dabbler’ package for just one job. Although for broadcast standard recordings, the overall pricing seems very reasonable indeed and worth a punt on the discounted annual fee. Squadcast will very soon include video, which even for audio recordings is a useful tool for communicating with the remote studio.
Ringr has integrated the mobile phone (IOS and Android) so all participants can call from their phone in addition to the Firefox or Chrome web app where the recordings are made. Useful if it’s a committee recording or requires input from a variety of people. The Ringr package is $18.99 per month for a premium plan.
IpDTL is marketed as a replacement for the aforementioned ISDN and aimed at professional recording studios. It ranges from £10 per month (UK) or a £15 day pass for a single day’s recording.
Perhaps a little more technical than others, but none the less a great option for technically minded voice artists requiring rock-solid industry standard results.
So there are just a few of the available apps and programs. There are lots more including Zoom, Cleanfeed, Clearcast and Soundtrap. All offering a variety of packages similar to the four featured here. One thing to remember before choosing a remote recording app is that it’s a 2-way thing. The studio or broadcaster that offers you the work may have a prefered system of remote recording and wish you to comply with that. The apps mentioned here would be intended to give you an opportunity to accept work and then offer a method of delivery to your customer.
So that’s the software. What next?
As for hardware, this depends on how far you wish to take your home studio set up. For these purposes, we are discussing single voice recordings. (they may end up as multiple voices, but each station is recording a single voice). So the requirements are fairly basic and straight forward.
Most importantly you will need a high-quality microphone. After all, you will be downloading software that is capable of recording broadcast quality files. So it’s not wise to cut corners or use microphones that are built into your PC or MAC. These are poor quality and only of use for domestic use such as facetime and video conversations.
Microphones
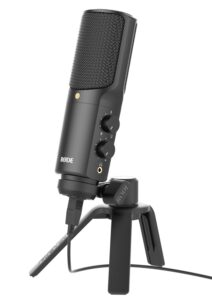
These days it’s possible to plug directly into your system via a USB port. There are a variety of microphones available on the market that connect via USB. For voice recording, the best would be something like the Rode NT-USB. The (originally) Australian based Rode has an outstanding reputation for providing high-quality voice mics after introducing the sublime Rode NT2 in 1992. To this day, the NT2 has proved to be as popular as ever in the home-based studio market. So, for this reason, it’s really the number one choice, whether you decide on a USB connection or XLR, which we’ll get on to later.
Other choices may be the Audio-Technica AT2020USB PLUS. It’s a condenser mic, which makes it very sensitive to background noise such as traffic or children(!) But the quality is very good indeed and the AT2020 is the XLR version of the same microphone.
Both these microphones are under $200 in price, making them a very affordable option when setting up your home recording studio.
Others include the Rode Podcaster (Rode again!), the SE Electronics X1S (SE Electronics have a huge range of vocal mics) and the Blue Yeti (a firm favourite with podcasters and for good reason).
So there we have it. A whole range of high-quality affordable microphones. Not forgetting of course that you will need a pop shield (some are provided as standard) as you will be recording your voice at very close range.
I mentioned an XLR connection which is the standard balanced connector for a microphone. You may prefer this to a USB mic as the XLR is likely to produce better, cleaner results. However, it does mean that you will require an audio interface to get the signal into your computer. Having said that, XLR is the best option for the best results, even though it is slightly more complicated to connect (see audio interface below).
Headphones
As with the microphones, there is a huge range of headphones available. Audio-Technica, Shure and Sony make a vast range, but my personal choice would be Beyeringer’s DT 250s. A good all-round pair of ‘cans’ that have an excellent dynamic range and are uncoloured or flat, meaning that what you are hearing is very much the same as the signal that is being recorded. With headphones, as with most equipment, it’s a personal choice so it’s good to test out a few different models before you make your final choice.
Audio interface
OK, we have a mic, we have headphones. Now wouldn’t it be great to have a box we could plug all that into, that not only allowed us to control the sound, but also acted as a pre amp to boost the signal from the mic and finally, converted our analogue voice into a digital signal?
Well, yet again there are many available. In fact some companies bundle together mic, headphones and interface for a very reasonable price. But my view is that not all companies are experts at producing all these 3 devices and you may be substituting convenience for quality in at least one of the items.
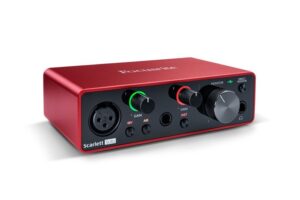
For this reason, I would recommend a tried and tested company for the audio interface and plump for the Focusrite Scarlett. There is a huge number of these available in the range, each with different features for different applications. The Scarlett Solo USB, for instance, has gain control for both XLR/jac mic and jac headphones. Everything needed for single voice recordings.
Other manufacturers of top quality audio interfaces include PreSonus, Beyeringer and Audient. Needless to say, there are many more.
And away you go…
Well, maybe not quite, but with all the above, you are definitely on the way to saying “yes”, when a studio asks, “can you record from home?”
And of course, all this can be taken as far as you want. You may decide for instance that you need to back everything up at home, in which case you could run a DAW such as Cubase or Garageband continually recording the entire session. Or you could then simply edit and use these recordings as your finished files. Alternatively, have a separate output to a Zoom H6 handheld recorder or similar. So that you can make remote copies of the entire session.
Once these decisions are made, all you need to do is find a quiet, dampened (lots of carpet, less windows) room in your house, away from water pipes, traffic, children and pets. download the software and familiarise yourself with the functions. Install your audio interface, making sure it has all the relevant drivers to operate on your system. Plug in your mic and headphones, either via USB or the audio interface. Test everything dozens of times, so that there are no hitches when you begin recording. And away you go.
You can’t always rely on somebody else being available with the equipment and knowledge to record good quality podcasts and voice recordings, so getting used to working independently from home will give you an edge, and more options going forward.
Simon Power is a sound designer & composer for BBC’s Doctor Who audio dramas. He is signed to Banco De Gaia’s Disco Gecko record label and as Dream Valley Music he produces music cues for all types of visual media. He is recently a credited composer on the Emmy nominated Amazon Prime series, Conversations in LA.