Tools and techniques for removing unwanted noise from vocal recordings
by Richie Nieto
One of the biggest differences between film and documentary sound versus animation and video game sound is that, usually, in films and documentaries, the recording environments are not fully controlled and often chaotic. When shooting a scene in the middle of a busy street intersection, for instance, the recorded audio will contain much more than just the voice of the subjects being filmed. Even in a closed filming environment in a “quiet” set, there is a lot of ambient noise that will end up in the dialogue tracks.
Traditionally, in the film world, dialogue lines that are unusable due to poor sound quality are replaced in a recording studio, in a process called ADR (Automated Dialogue Replacement). Documentaries don’t have the same luxury, as interview answers are not scripted and the interviewed subjects are not actors (and wouldn’t be able easily duplicate their own previously spoken words accurately in the studio). There are also issues of budget limitations – ADR is expensive, and most small-budget productions can’t afford to replace every line that needs to be replaced.
So, the next best option is to clean up what is already recorded, as best as we can. I’ll explain some of the tips and techniques to ensure that you get the most out of the material you have. As a brief disclaimer, keep in mind that some of these techniques are divided up between dialogue editors and re-recording mixers on most professional-level projects, so if you’re not mixing, make sure to consult with your mixer before doing any kind of processing.
As an example of bad-sounding dialogue, we have the following clip:
This clip has a number of problems (aside from the poor performance by yours truly). There is hum and hiss in the background and, due to improper microphone technique, loud pops from air hitting the diaphragm too hard and the voice sounds very boomy. This would be an immediate candidate for ADR. However, we will assume the budget doesn’t allow for it to be replaced, or the actor is not available. I’ve had situations where the actor just doesn’t want to come into the studio to do ADR, even though it’s in their contract, and no amount of legal threats will convince them otherwise, so the only course of action in those cases has been to make the bad-sounding lines good enough to pass a network’s quality control.
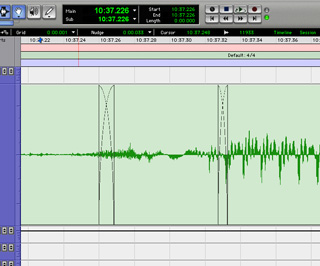
Okay, so let’s get to it. The first step is to filter out some of the boominess with an EQ plugin. For this example, I’m just using one of the stock plug-ins in ProTools. All of the processing here is file-based, as opposed to real time processing, mostly to be able to show how each step affects the clip.
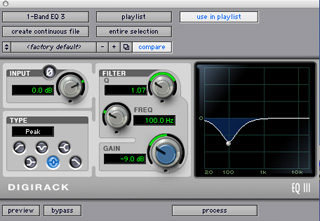
By listening and a bit of experimenting, we can hear that there is a lot of bass around 100 Hz in our audio file. Here’s how the clip sounds after removing some of the offending low frequency content:
Next, we’ll use a noise reduction plug-in to get rid of some of the constant background noise. There are plenty of other options in the market, but I’ll use Waves’ X-Noise for this example. The trick here is to not go overboard; if you start to hear the voice breaking down and getting “phasey”-sounding, you need to pull back on the Threshold and the Reduction parameters. You won’t get rid of all the noise with this step, but I find it yields better results to use moderate amounts of processing in different stages instead of trying to cure the problem by using a single tool.

After having the plug-in “learn” the noise and then adjusting the Threshold, Reduction, Attack and Release parameters, we process the clip, which now will sound like this:
There is still a fair bit of background noise in there, so now we’re going to use a multiband compressor/expander to deal with it. In this particular case I’ll use Waves’ C4, but, once again, there are many equivalent plug-ins to choose from. I am just very familiar with the C4 and how it behaves with different kinds of sounds.
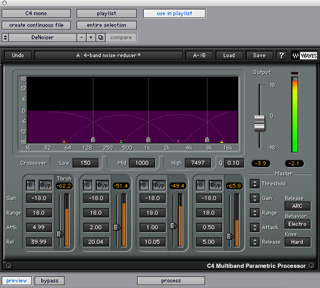
We need to set the parameters for expansion, which does the exact opposite of compression: it makes quiet things quieter. That’s why we apply it after the noise reduction plug-in, so that the noise level is much lower than the voice when it goes through the expander. A normal single-band expander will not work as well because the noise lives in different areas of the frequency spectrum, and those need to be addressed independently with different amounts of expansion.
Now there is a vast improvement on the noise level on the clip, as we can hear:
Okay! The following step is to tackle the pops caused by the microphone’s
diaphragm being slammed hard by the air coming out of my mouth. Obviously,
this is a problem caused by bad planning, and it is replicated here to
illustrate a very common mistake in recording voiceovers. In this case,
the most offending pops are in the words “demonstrate” and
“process”.
A solution that has worked really well for me many times is actually
very simple. It involves three quick steps. First, select the part of
the clip that contains the pop, and be sure to include a good portion
of the adjacent audio before and after the pop in the selection.
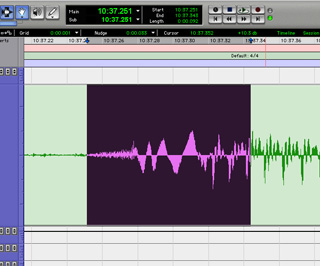
Use an EQ to filter out most of the low end of that selection. This will automatically create a new region in the middle of the original one.

Then crossfade the resulting regions to eliminate any clicks and to smooth the transitions. You will need to experiment with the crossfades’ proper positions and lengths, and the exact frequency and the amount of low end content to be removed, based on the severity of the pop.
And now, without those loud bumps, our clip sounds like this:
Finally, I do a second pass through the multiband expander to remove the rest of the noise, and some EQ tweaks to restore some of the brightness lost in the process.
If you compare the first version of or audio file to this last one, you’ll hear the huge difference that is accomplished in sound quality by using several different steps and combining tools and tricks. As you know, there are always better and more affordable software applications being created for dealing with noisy audio, and some of the newer ones are able to cover several of the stages that I’ve described here. Others, which use spectral analisys algorithms, can even isolate and eliminate incidental background noises that happen at the same time as the dialogue, like a glass clinking or a dog bark. So the game is constantly changing.
In closing, hopefully this article will serve as a guide on how to tackle some problems with audio material that, for any reason, can’t be recorded again. It’s by no means a definitive approach to eliminating noise, since the number of variables and tools out there is staggering. So experiment, and have fun!

About the author: Richie Nieto has been a professional composer and sound designer since the early nineties. He has been involved with projects for DreamWorks, Lucasfilms, Dimension Films, Sony Pictures, HBO, VH1, FOX Sports, Sony Music, BMG, EA, THQ, Harmonix and many more of the biggest companies in the entertainment industry. His work can be heard on many commercially-released CDs, feature films, documentaries, video games and over 30 television series for the U.S. and Canada. Recently, Richie has composed music and/or designed sounds for projects like EA’s “Nerf N-Strike”, “Nerf 2: N-Strike Elite”, “Littlest Pet Shop”. “Littlest Pet Shop Friends”, and THQ/Marvel’s “Marvel Super Hero Squad”. He also finished work on Ubisoft’s “James Cameron’s AVATAR: The Game” and is currently a contract composer and sound designer for EA. VIsit Richies website at www.richienieto.com