The absolute beginner’s guide to the Orchestral MIDI Mockup
By Thomas James Slater
Like many composers in the more analog field of pencil and paper, I was entirely unaware of the other side of music production. For years I thought that the bleep and bloop of midi, compliments of my music notation software, were all I could get from a computer and the only way to get a decent recording was to have it performed on stage. As I discovered a few years ago, this is most assuredly not the case.
Rather than give a long history of the leaps and bounds of music production and midi innovation, I’m going to go over the basics of producing a midi mockup in a short amount of time for the least amount of money. This is written chiefly for aesthetic purposes in mind, not to learn how to navigate any particular software. Now that we know that, let’s get down to it shall we? First on our checklist are what I consider a couple essentials. You’ll need a sequencer (listed below). Ideally you want a program that is specifically good at midi sequencing. While pro tools is an audio champion and industry standard for recording audio, you may find it lacking for midi sequencing.
Secondly, a midi input device. Usually this is in the form of a keyboard of 49, 61 or 88 keys. Smaller keyboards may be quite limiting for impromptu realization of wider orchestration, so I recommend the larger ones. You don’t need anything fancy mind you, no need for a vast array of buttons, triggers, knobs or nozzles. Since these are not synthesizers, you won’t need them and the ones with the extra gizmos are going to cost you more.
Thirdly, the sample software. If you buy Logic, it comes with a library that will be good enough to start with. If you buy something like Digital Performer, then you’ll have to buy separate software.
There are many options to choose from insofar as instrument samples (listed below). They all have their positives and their negatives, you can find samples of any of them online. For future reference, when referring to midi mockups, samples refer to wavetable patches available in a given library. These are actual instruments that have been recorded and are loaded into a particular samples library. Each patch is then triggered by your midi controller at your discretion. If you’re new to this and your budget is small because you’re a student, just starting as freelance or a little of both then this is all you need to get started.
Now that you’re set up in your studio, you should probably take some time to get to know it. Test out all of your samples, note what samples sound especially good in your library. In doing this you can get a good feel of a sample library, and you get a good knowledge of what you can possibly do with it. For instance, when testing out Garritan’s jazz & big band sample library, I found I absolutely loved the solo clarinet on it. I wouldn’t have known that if I didn’t explore the samples first. Get to know your sequencer too, you can probably get away with only knowing a few key things about it to get started. Among them are velocity control, quantization, and midi limiting.
Next, what is your goal with orchestration? Do you intend to use real instruments in the final production of the score? If you are, you probably don’t need to be quite as meticulous about your mockup for this is merely for either a director or a producer. If not, then there are a lot of details to pay attention to.
What we’ll focus on now is for all of you you who are making the mockup the final score. If you’re new to this, you’re probably used to sequencing the music in notation software such as Sibelius or Finale. This is a fine method to begin with, I use this method for more contrapuntal work to make sure my lines are clear. I’m sure if you’ve chosen the import method you may be disappointed at first, but don’t fret. All is not lost.
You may find your mockup ‘too precise’, articulations and dynamics have suddenly disappeared or there’s an ineffable ‘something’ that just takes the fun out of the music. This is no surprise, as you’ve turned a computer performance into another computer performance! Those crescendos that you once had in your notation software may not have necessarily made an appearence in its general midi export. You’ll have to draw those in yourself. I use digital performer to do this, and in its midi editor I can open the tools menu and draw a parabola for the rising and volume of volumes. This arc is a more ‘human’ crescendo than a straight line in my opinion. A similar option exists in any of the prescribed sequencers.
Your articulations are suddenly gone aren’t they? What was a staccato passage is now a smear of notes. Oh bother. This is where sequencing separates a little bit from notation. For that passage you will either need one of two things: 1. a seperate staccato patch loaded or 2. what is called a ‘keyswitch’ sample. This means that a change in samples is registered by a key at the left end of the midi controller keyboard. However, let us assume the former and you load in a staccato version of the instrument into your sampler. Now you have two patches loaded up of your instrument. A legato and a staccato. You can move that staccato passage down to it via the midi editor, hear it play back. This is of course valid for any change, be it from legato to marcato, stopped horn to horn rip, or bartok pizzicato to harmonics.
Now that we have our articulations and dynamics fairly under control, let us move on to the ‘human quality’ of the performance. If you’ve imported your midi, you may find that it’s ‘too robotic’. If you’ve played in the music via the midi controller, then you may find it’s a little ‘too human’.
When I posit ‘too human’, this means that the timing may seem a bit off after you record with the midi keyboard into the sequencer. Even if you have a fantastic sense of tempo, it will most likely not be as perfect as you like. Latency of even 5ms can make a track lose musicality. The other problem is inconsistent dynamics. If you have a less expensive midi controller, the keys won’t be weighted and so it will be difficult to get a steady sense of dynamics.
Between those two deficiencies, it won’t sound remotely professional in that state. That’s ok! We can fix that!
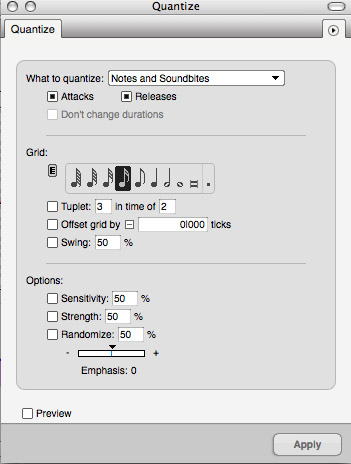
Let’s get a hold of those timings first. In your midi editor there is an option to ‘quantize’ your notes. Quantize means aligning notes to a particular setting set by the user. This may take some practice to do well. Based on the quantizing settings, you set the detail in how much you want to quantize. The side effects include: making shorter notes too long, you ended up with entirely the wrong rhythm you intended and/or it just becomes too precise. One last bit of advice on durations: full instrument sections never change notes at exactly the same time. I find it sounds smoother if I have a slight overlap of the notes in the sequencer.
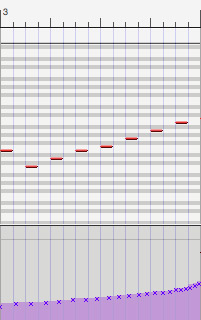
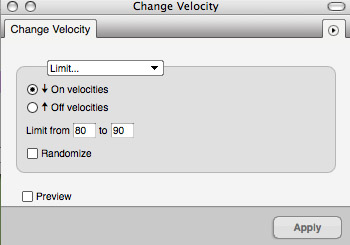
So if you’re happy with your note durations, let us move on to velocity (or dynamics) after recording in through a midi controller. There are a few methods to get a good sound you’ll like. You may try, most tediously, to change the value of every single note between 0 and 127. I wouldn’t suggest doing this until later, and even then only if you really need to. A better idea would be to select a passage that you want to change the volume of, select it, then find in your midi editor the way to ‘limit’ the velocity of all the notes in that passage. This method is especially good if a passage you’re editing doesn’t change volume that much. There’s very little fuss. Once again, this is something to try a few times until you get a good feel for how it affects the patches you have loaded. I tend to aim fairly high in volume for this, highest for strings, a little softer than that for woodwinds, and then brass where velocity typically effects timbre and brass instruments naturally stand out more anyway. For crescendos, as I’ve suggested earlier, a parabola curve is typically available in the midi sequencer of your choice. Don’t just take my word for it, experiment! Insofar as midi, there is only one step left: Freeze! Before you can bounce down those tracks you must convert them to wavs in order for you to bounce those tracks into a single audio track. If you’re happy with your midi mix, go right ahead. Remember though, it’s easier to fix individual errors in midi than trying to bounce down your tracks first. This is also the point where you should do any mixing then mastering (which I highly recommend) but that’s another article entirely. There are many more wonderful things you can do with midi mockups, but we’ll save those techniques for another day!
Sound clips MP3:
Recommended Sequencers
These are what I like from most to least for symphonic mockups only, by no means are they best to worst. It is merely my list of tastes, your tastes may differ. For midi I tend to use a mac, but I do quite like Cubase on PC. Apologies to Linux users, I don’t know the software well enough to recommend anything in particular.
MAC
PC
Recommended virtual instruments
- East West Quantum Leap — If you’re on a budget, the silver edition will be for you. I’ve had the gold edition for years.
- LA Scoring Strings — I am quite a fan of this package as well. These samples may leave your jaw hanging.
- Garritan Personal Orchestra — The least expensive, yet it can pack a punch.
is an American composer and sound designer active in the video game industry.
His credits include include Guitar Hero 3, Tony Hawk’s Proving Ground, as
well as a number of flash games and short films. He is currently working
on a Cyberpunk MMO based on the Tad Williams Otherland series of books.
He currently resides in Singapore. his personal website: http://tjslater.tumblr.com