A Method for Streamlining Your Workflow to Maximize Creative Output
By Kole Hicks
Pro Tools has never had the reputation of being (MIDI) Composer friendly, but with the upgrade to PT 8 I’ve found that it’s now my preferred sequencer when composing. The method I’ve been using and will share with you today has some great benefits to it, but also a few drawbacks… lets go over them below.
First the negatives… The main drawback to using this method is that it’s quite time consuming at first. So if you have very strict deadlines and not enough time to familiarize yourself with this method, then it may not be for you (at least not at this time). Also, somewhat related to the previous drawback, you must be fluent in both Pro Tools 8 and Sibelius 5 +. Otherwise, using this method will just be frustrating and inefficient. I wouldn’t call this a negative, but this method is not really necessary for loop-based/electronic composers. This method caters more towards the crowd of composers who like to notate their work and tend to write orchestral pieces. Last but not least, if you’ve just purchased your first few virtual instruments or sample libraries then this method may not be for you. This method works best for a composer who is familiar with his/her libraries.
With those negatives out of the way, it’s time to talk about the benefits of using this method. If you are familiar with Pro Tools 8 and Sibelius 5 +, then you’ll be able to use this method to more accurately compose for your project and have a notated copy of your most important parts! I’ve found that when I sit down and focus on every aspect of notating something (as you have to in Sibelius), my ideas are more complex, richly detailed, and accurate towards what I want to express (especially if it’s an instrument/section I can’t play or in a style that is not improvisatory in nature). It’s also fantastically convenient to have a majority of the parts already notated for those times you’d like to have some studio musicians come in and record their parts to help your mostly sample-based Composition sound alive.
So with that little intro out of the way, lets get to the method…
First off, I like to start with a few of my own personal Pre-Compositional “rituals” which usually consist of watching the video, looking at some concept art, or other inspirational project material, and describing everything in detail. (Perhaps my own personal Pre-Comp rituals would be a good topic for a future article, but I’ll spare you the time in this article :)) After this is completed to my satisfaction, I would begin to work in Sibelius.
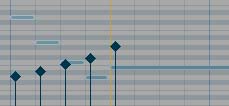
If it’s a video you’re working with, then you should go through and map out the hit points and decide which ones are important (downbeat hits) and others which shouldn’t carry as much weight (less emphasized upbeats etc.) {Ex. 1}. If it’s concept art or something else that doesn’t need to be time synced, then imposing a “big picture” form on the entire thing is a wise decision. Which really just means that you’d be making a rough blue print on where important changes are to occur and how long you’d like the piece to be. All of this is subject to change when the “ink hits the paper”.
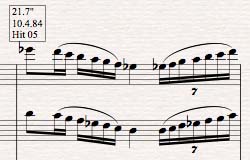 |
| {Ex. 1} (This Example is already notated, but yours won’t be at first) |
Next, it’s best to actually take a step back from Sibelius and choose your instrumentation based off of all the information gathered in the Pre-Composition process. By this time, you should have a rough idea of when certain instruments will be used, what will be your primary/focus instrument, your background instruments, etc. All of this is important to physically write down for three reasons. One, studies have shown that a majority of people remember and learn better if they physically write down something as soon as they think of/hear it. Two, you’ll have something to go back to later as reference in case you forget. Three, if your piece becomes huge and yourself famous, then this little piece of paper could be worth a ton and you could sell it on E-bay :-P.
Once this is done, all of the organizational markers and structures are in place for you to begin composing. How you do this though, is completely up to you. I know many people who like to just improvise on their instrument (keyboard, guitar, etc.) until they come up with something appropriate. However, I know of many others who can already hear a majority of the piece in their head, so they immediately begin notating. I personally have used both methods, as the situation always dictates my process. For example, I will always “toy” around on the guitar first to come up with a metal groove or jazz chord melody. If I tried to notate either of these two things before playing them, then it will almost always come off as contrived. This is almost never the case when I write for something like a choir or string quintet. I always try to hear those parts in my head first, and start with notation. I’ll only go to the keyboard/pick up a guitar if I’m lacking inspiration or can’t hear the complex harmonies in my head. As a wise man once told me, “It’s all about context.”
Now, the great part about using Sibelius first (besides the fact that you have a hard copy of what you composed for future performers), is that you can go into rich detail and add articulation, dynamics, etc. Although some of your details may not translate into transferable MIDI data, the important part is that you were thinking about your composition in more depth (something you may not get if working outside of notation). You can always “tweak” later in Pro Tools to accurately express the detail that your Sibelius MIDI left out. However, most of the time Sibelius can pick up these nuances and is able to translate them into importable MIDI data. This will make your job in Pro Tools that much easier.
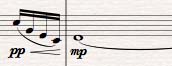 |
| {Ex. 2} |
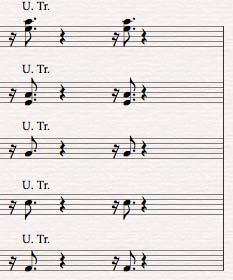
It’s also important at this point to think ahead of the libraries you’ll be using to record these parts (I can’t stress enough the importance of familiarity with your libraries when using this method). For example, I may want an unmeasured tremolo articulation in the string section of this piece, but by being familiar with my libraries I know that I already have a great sounding unmeasured tremolo articulation. However, it only works over a sustained MIDI note. Sibelius will literally chop up that unmeasured tremolo articulation into many MIDI notes and will almost always sound “robotic” if used as is.
So, in my Sibelius notation I will leave the string section without the unmeasured tremolo articulation and instead add a note right above saying “U.Tr.” for unmeasured tremolo. {Ex. 3} (Measured tremolo is different and can usually be used as is). Then, when you import the MIDI data into PT 8, all you have to do is remember where you wanted to have the unmeasured tremolo articulation and switch up the string patch for that section. Little things like this can either make your workflow consistent and seamless or be utterly frustrating to the point of discarding this method entirely. That’s why I stress the importance of being familiar with your libraries.
 |
| {Ex. 3} |
I know a few of you are probably thinking right now. “Are you saying we should notate every single instrument out and do so before we even play/record anything? I don’t have time for that!” The answer is actually… “No”.
I recommend only notating the instruments that: Aren’t improvisatory in nature (sometimes stylistically dependent), you might have a session musician come in and play later, or you can’t accurately articulate while playing through a MIDI keyboard/controller. For me personally, I’ll usually just notate the Orchestra’s “foundation instrument sections” like the strings, brass, and woodwinds or whatever other instrument/section is most important in this piece. It may be all of them or just one… it completely depends on the length of the piece and my deadline. Context :).
So lets say during the notating process you run into writer’s block, are getting bored, or decide that some “non-notateable” instruments have a larger role in this composition. At this point it’s perfectly fine to begin working in Pro Tools and recording a few of the parts which don’t need to be (or aren’t able to be) notated. This will help break up the monotony of the notating process and may even inspire new ideas! Just make sure to have your PT session “mapped” out like you did in Sibelius before you begin recording.
That segues to our next important topic in this method… map out your PT session :). That means making markers at hit points/important sections, changing meters/tempos, and all of the other little things you can do to help reference back to where you are (and what should be happening) in the piece. As long as your not asking yourself “Where was this part supposed to go again… or where the heck was that hit in measure 43?” then you’ll be fine.
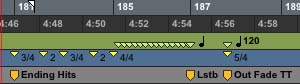 |
| {Ex. 4} |
Now that you have your PT session mapped out, it’s time to convert your Sibelius Notation into MIDI data and then import all the MIDI data to your PT session. I prefer to have just one Stereo Aux Track with a VI loaded as a plug-in and then bus it through to its appropriate Audio and MIDI track. {Ex. 5} However, you can also take the imported MIDI data and use instrument tracks instead… it just tends to take a lot more work and CPU if you have a ton of tracks to work with.
 |
| {Ex. 5} |
Once your tracks are all set up how you like (color coded, grouped, etc.) I would recommend going through and slightly altering the velocity on each one of your MIDI tracks before recording. Even though your Sibelius dynamics will be included in the MIDI data it’s not always perfect and doing this will help “shape” the piece and feel more realistic in the long term. At this point, your ready to load up the appropriate virtual instrument(s) and record all of the audio. Of course, as you listen to the piece and it begins to take form, you’ll find that some of the parts you wrote aren’t necessary any more or that you may even like to add a few new ones. That’s perfectly natural and a part of the Composition process. If you feel that this method feels too “robotic,” then I would recommend playing only the main melody/focus line on your keyboard and keep the rest true to this method. You’d be quite surprised at how that tends to “rejuvenate” the other instruments.
The end result of using this method (after mixing/mastering which would be a completely new article) is something that you not only have a hard copy of, but have probably thought more about as well. Thus helping it feel more authentic and accurate in expressing yours (or the project’s) intention. In fact, if you’d like to hear the result of one of my pieces using this method, just Click Here and tell me where to send the track.
Thanks for reading, take care, and keep composing fellow artists!

About the author: Kole Hicks is an Author,
Instructor, and most prominently an Audio Designer with a focus in Games.
He’s had the pleasure of scoring mobile hits like ‘Bag it!’, has provided
audio for Indie PC titles like ‘Kenshi’ and ‘Jeklynn Heights’, and was nominated
for a 2012 GANG award for an article written exclusively for Shockwave-Sound.com
titled, “Mixing as Part of the Composing Process. Emotionally Evocative
Music & Visceral Sound Effects… Kole Audio Solutions.