by Simon Power
In this series of articles we will be offering fundamental help and advice to amateur and semi-pro audio/visual producers who use Sony Vegas and want to incorporate music, voice overs and SFX in their productions.
Introduction
In part one of this tutorial, we looked at importing and timestretching audio files in Sony Vegas Pro 8 ®. In this exercise we continue with our project to produce a 35 second promo ad for a garden centre, by examining ways to mix, add FX and then render our finished project.
Our voice over is 30 seconds long, while thanks to timestretching, the music is now 35 seconds in duration. This gives us 2.5 seconds of music to use at the start and end of the promo to wrap around the voice. So with the music at 00:00:00, we now place the voice over at 00:00:02.500. Now we should get a nice couple of seconds of music before the voice over kicks in. OK, great. So let’s give it a listen.
We click shift + spacebar to play from the start of the project and the music plays in nicely. But what’s this? When it hits the voice over, our limiter is working overtime, peaks are in the red and the voice over is completely lost in amongst a muddy dirge of frequencies. Yes, of course, we need to dip the music under the ‘Voice Over’ file so that both elements mix together in perfect harmony.
Again, there are a few optional ways we can do this. First of all let’s try the manual way.
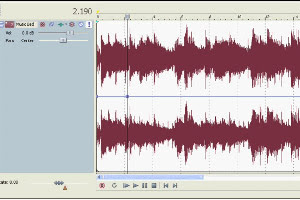
Highlight the music track (‘Music Bed’) by clicking in the ‘track header’. Then hit ‘V’ on your keyboard (That’s ‘V’ for volume.). A blue line will appear along the entire length of the track dissecting the stereo channels of our music file. Approach this blue line with your mouse curser. The curser changes from an arrow into a pointing finger. Take that pointed finger along the line until it is directly under the start of the ‘Voice Over’ file on the track above. Double click, and a square block will appear on the line (see illustration). A box attached to this square should read 0.0db. If you now grab the box with your curser and pull it downwards you will notice that the volume alters. (reset it to 0.0db).
Using a number of these square blocks on the volume line, we can accurately alter the gain on an individual track and mix it with the other elements accordingly. Let’s begin a fade at 2 seconds into the music file. Create a volume block at 00:00:02 and one at 00:00:02.500. Pull the second block down and note the reduction in gain at that point. You may be surprised just how much you need to dip the volume so that the voice over takes precedent over the music. It may be as much as 10db. You’ll need to use your ears to judge when a mix is right. Take into account we may be compressing the audio at a later time, which will bring the hidden frequencies forward. So a little compensation may be needed there.
When you’re happy with the introduction, do the same at the end of the voice over to bring the volume of the music back up to 0.00db. A gradual fade in of the music over the last 2.5 seconds of the voice over may be effective, but be aware that every syllable of the spoken word has to be clear and audible before bringing the music back in to reclaim those frequencies.
Mix Automation in Sony Vegas
OK, so creating all those square blocks and laboriously altering each one is no fun? Well, there is another way. In Vegas you can automate both the volume and pan functions on each individual audio track.
First, go to the ‘track header’ and highlight the ‘Music Bed’ track. Hit ‘V’ as before to insert our volume line.
Next, go to the ‘track name’ box in the ‘track header’ there are 6 icons. ‘arm for record’/’invert track phase’/’track FX’/’automation settings’/’mute’ and ‘solo’. Click on the ‘automation settings’ sun shaped icon (actually it’s a machine cog for ‘Automation’). This will reveal a drop down menu. Currently it may be set to ‘automation off’. Move it to ‘automation write (touch)’ and tick the ‘show automation controls’ box.
Now we hit shift + spacebar to play the music from the top. Below the 6 icons, you will note that all the audio tracks have a separate volume and pan control. Grab the volume control and move it around. You’ll notice that those square boxes are back on the volume line, but this time they are appearing automatically in conjunction with your movements on the volume control. Likewise, if we play with the pan control, an orange line appears alongside the blue one on the audio track, and the music pans from left to right as we alter the control. All this happens in realtime, so you get the effect of live mixing.
But there’s an art to this ‘automation’ process. It may take you a few goes before you get the mix exactly right. Of course you can do a rough automated mix and then alter the volume line manually afterwards. This will be quicker than doing the entire mix manually and may help save some time in the long run.
So, We have timestretched our music and mixed our voice track over the top. We are now well on the way to finishing our project. But we still have a number of processes available to us before we can wrap things up and present our finished promo to the folks at the garden centre.

Volume edit points appear as squares.
FX processing and Plug-ins
We have already put a limiter set to 0.00db across the entire project, which we accessed through the effects icon on the master volume control. But for individual FX processing, we are instead going to access the FX bank via the FX icon situated on the track header. Remember the 6 icons next to the ‘rename’ box? This is where we look for our individual track FX icon. It’s the third one. Between ‘invert track phase’ and ‘automation settings’ (see illustration).
Let’s say, for this exercise that the ‘Voice Over’ track needs compression, as even after mixing, the original recording was getting a little lost when the music bed was added. Compression may help add some ‘thrust’.
Click on the FX icon on the ‘Voice Over’ track and you will see a display called ‘audio plug in’. On Vegas version 8, the audio tracks already have 3 default FX: Noise Gate, EQ and compression. These are pretty standard Sony FX. You may have a favourite Waves compressor that you want to use instead. So first, highlight the Sony compressor plug-in. In the top right hand corner of the box there are 3 FX icons. Hover over the one that displays a cross over it (‘X’). This removes that particular plug-in. Click this and the plug-in disappears leaving you with just the Noise Gate & EQ. To add your favourite Waves plug-in, click the icon next to the one you have just used. This will display a box ‘plug-in chooser’ and the name of the track ‘Voice Over’ (see illustration). There you will see all your familiar FX as Vegas supports both VST and DirectX plug-ins and will have accessed them all during the installation process. Highlight your Waves compressor, click ‘add’ and then ‘OK’. If you just click ‘OK’ the effect doesn’t load into your project. You have to ‘add’ it to the effects chain. Your compressor will now appear alongside the Noise Gate & EQ.
Let’s say you adjust the expander by a few db to smooth out the dynamics, you can then save those setting by renaming the compressor (‘Garden Centre Voice Over’) and clicking on the floppy disk icon next to the name box. Already the voice over is sounding better and maybe it will benefit from some added EQ as well. Click the EQ plug-in and you will notice there are a number of presets in the drop down menu. One of these is called ‘(Ultimate S) Female Voice Over’. Perfect! Add that. Similarly, you may have other more defined EQ that you wish to use from your own FX bank. You can of course access these as you did the Waves compressor.
As for the voice over, it’s now showing a marked improvement, holding its own nicely against the music. You can now exit the audio plug-ins box.
Just like volume and pan, you can automate all the FX plug-ins and have them running in realtime with automated FX. But for this project, we just need a single effect over the entire track, so we’ll leave the automation to a later tutorial.
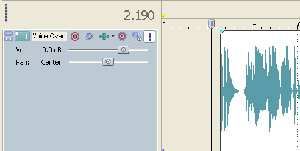
The FX icon is the third icon along in the track header.
Overall FX processing
As for our project, the music was sounding just fine, so no need to add any external FX or processing. The voice over is now punching through nicely courtesy of some added compression and EQ.
Now, I may be temped to add a touch of compression over the entire project,
But compression can be an unruly beast if it’s over used. You have to consider every possible scenario in which your piece will be heard. It’s OK for broadcast through a public address system at a garden centre. They probably don’t use any compression on their broadcasts. It’s simply a CD player attached to a mixing desk. A touch of light compression over the entire mix will be fine here. But what if they decide to broadcast our finished promo on local FM radio? They compress like crazy! If I add too much compression now, it may sound awful. The best thing to do is to make all your decisions ‘moderate’. Adding a pinch of compression over the entire mix will add life and buoyancy to the over all sound. With moderate use of compression, we’ve created a robust mix that will suit a number of different circumstances.
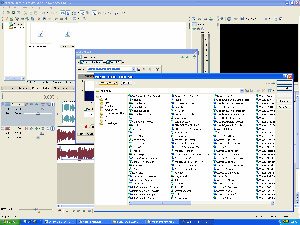
Select an effect using the plug-ins choser
Rendering in Sony Vegas
Listening through to the mix a number of times, I am now happy that I don’t wish to make any further changes. It has a nice introduction, the voice is sparkling with its added compression and EQ. And a moderate amount of compression over the entire project has made it bounce along nicely. It’s a job well done and I’m ready to render the file to our ‘Garden Centre Promo’ folder.
To do this I go, ‘file’/’render as’. Previously, you may have been rendering a video project, so the ‘Save as type’ setting could be set to .avi, .wmv or .mov etc. We are making an audio file and we wish to render as a .wav. Look in the ‘Save as file’ drop down menu for the ‘Wave (Microsoft) *.wav’ setting. This will ensure that our project is rendered as the correct type. The description should be 44.1kHz at 16 Bit as per our project settings. Rename the file garden_centre_promo_1, browse for the folder, click ‘save’ and away we go.
Within seconds the file will be rendered and ready to be transferred to CD or memory stick, or an FTP site that can be accessed by your customer.
Burn to CD
Once you have rendered the track as a WAV file, you may wish to burn a CD directly from the project. This couldn’t be simpler. Put a blank media you’re your CD burner drive, Click on ‘tools’ and ‘burn disc’. Choose an option from the drop down menu (‘track at once’ audio CD or ‘disc at once’ audio CD) and click ‘start’. The entire project will be rendered as one track onto the CD. (You may also want to refer to this article about choosing the right burning speed when burning audio-CD’s. Ed.)
Conclusion
With our ‘Garden Centre Promo’ project rendered as a WAV file and burned to CD, it’s now ready to present to the folks down at the garden centre. At 35 seconds and with pleasant music and a sparkling voice over I reckon it’s well within their brief. It won’t be long before we hear our production being broadcast between instrumental cover versions of well known hits, while newly wed couples scour the shelves on their quest for the perfect potted plants for their new home!
It’s not what you quite imagined doing for a living when you set up your multi media audio/visual production business, but, hey. Work is work. Whatever pays the bills! All you can do is make it sound as good as it can possibly be and build up a reputation for quality work at a competitive price. And hope that eventually Jay-Z returns your call!
Resources:
Vegas Pro product page at Sony Media Software
Royalty-Free Music by Pierre Langer at Shockwave-Sound.com
More in this series:
You may also want to read Part One of this series.

the author: Simon Power has made over 50 short films and documentaries
for the music technology website Sonic State. He has also removed &
replaced copyrighted music on a number of commercial BBC releases. In
these articles he offers advice and tips about using music in your low
budget film and audio/visual projects. You can learn more about Simon
and his projects at his website, http://www.meonsound.com/


