So, how to start?
With a plan. First off, I imagine in my head or on a sheet of paper the placing of individual instruments/musicians on the virtual stage and then think how to “re-create” this space in my mix. Typically I’d have three areas: foreground, mid-ground and background. Of course, this is not a rule. If we make a raw rock mix with a sparse arrangement and in-ya-face feel we don’t need much of a space, on the other hand, in a dense, multi-layered electronica the depth is crucial.
So, I have divided all my instruments into, say, 3 spatial groups. Then, in my DAW, I set the same colour for every instrument belonging to the certain group, what is wonderfully handy – I immediately see everything at a glance.
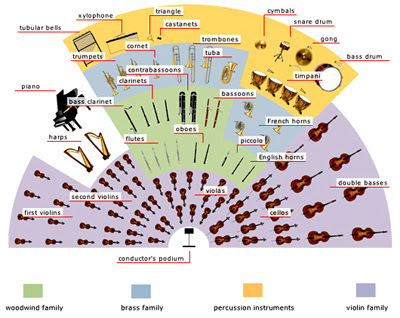
The tracks that I usually want to have close are drums, bass, vocals. A bit deeper and further I’d have guitars, piano, strings. And then, in the distant background I’d have synth textures or perhaps some special vocal effects. If there are string or brass sections in our song, then we need to learn about placing the orchestra instruments first in order to reproduce it. Surely this is the case only if we are aiming for realism.

But sometimes we don’t necessarily need the realism, especially in electronic music. Here almost anything goes!
Going back to our plan…
No matter whether we struggle for realism or not I suggest to start planning from pinning down which element will be the furthest – you need to identify the “back wall” of the mix. Let’s assume that in our case it is a synth pad. From this point, any decision about placing instruments closer or farther away has to be based on our back wall.
At this point we have to decide what reverb will we use. There are basically two ways of thinking. Traditionalists claim that we should use only one reverb in the mix, not to give misleading information to the brain. In this case we have the same reverb on each bus (in terms of the algorithm), changing only the settings – especially pre-delay, dry/wet ratio and EQ. Those of a more pragmatic nature believe that it’s not always the realism that matters, especially in electronic music and only the end result counts. Who are right? Well, they both are.
I’d usually use two, maybe three different reverb algorithms . First would be a short room type of reverb, the second, longer, would be Plate, and the third and farthest would be Hall or Church. Thanks to using the sends from individual tracks I can easy decide how far or close the instrument will sit on our virtual stage.
Do not add a reverb to each track, the contrast will allow you to enhance dimension and imaging even more. If you leave some tracks dry, the wet ones will stand out.
Filtering out the highs from our returns not only sinks things back in the stereo field, but also helps to reduce the sibilants – reverb tends to sort of spread them out in the space, what is very irritating. An alternative method of getting rid of sibilances from reverb is to use de-Esser on the sends.
Compression and its role in creating a depth
Can you use compression to help creating the depth? Not only you can, but you must!
As we all know, the basic use of the compressor is to “stabilize” the instrument in stereo field. It means that compressor helps to keep the instrument the same distance away from the listener thorough the whole track. To put it another words – its relative volume is stable. But of course we don’t always need it to be. This is particularly important for instruments placed back on a sound stage, because otherwise these will not sound clear. Now, how the compression can help us here? As we all know, the unwritten rule says that the gain reduction should not exceed 6 dB. This rule works for instance for solo vocals. The bigger reduction can indeed “flatten” the sound. Yet this is not necessarily the case when it comes to backing vocals or, generally, instruments playing in the background. Sometimes these are getting reduced by 10 dB or even more. In a word – everything what is further away from the listener should be compressed heavier. The results may surprise you!
There is one more thing I advise to pay attention to – two basic work modes: RMS and Peak. PEAK mode is “looking” at peaks and reduces the signal according to it. What sound does it give? In general – more squeezed, soft, sometimes even pumping. It’s useful when we want the instrument to pulse softly rather instead of dazzling the listener with its vivid dynamics. The RMS mode causes the compressor to act like the human ear and not focusing on signal peaks that often have little to do with the perceived loudness. This gives a more vibrant, dynamic and more natural sound. It works best if our aim is to preserve the natural character of the source (and that’s often the case for example with the vocals). RMS mode gives a lively, more open sound, good for pushing things to the front on our sound stage.
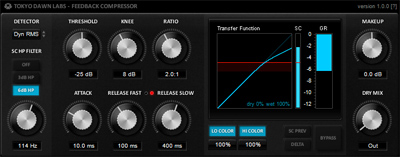
The interesting fact is that built-in channel compressors in SSL consoles are instantly switchable between Peak and RMS modes. You can find something similar in the free TDR Feedback Compressor from Tokyo Dawn Records.
Delay
Another very popular effect is delay. It is, one might say, a very primitive form of reverb (as reverb is nothing more than series of the very quick reflections).
As you may remember from the earlier part of this article, I mentioned the pre-delay parameter in reverb. You can use it in pretty much the same way in delay plugin to create the sense of depth in the mix. Shorter pre-delay times will make instruments sound further away from the listener, longer times will do the opposite. But you can of course use the delay in many different ways. For instance – very short reflection times with no feedback can also thicken and fatten the sound nicely. Try it!
The thing I like the most in delay is that it gives the mix a certain context of space. The music played in an anechoic chamber would sound really odd to us, as we hear all sounds in a context already from birth (the situation is of course no different with the music). No matter if you listen to a garage band, a concert at the stadium or in the club – context of the place is essential to an appreciation of space in which the music is playing.
Now, how to use all this knowledge in practice
And now I will show you how I use all of this information in practice, step-by-step.
1. The choice of reverbs.
As I said before, the first we have to consider if we aim for realism or not.
I always struggle when it comes to reverb. Like, what the best sound settings for what instrument/sample. Should I use a Hall or a Plate? Should I use an aux or use it as an insert. Should I EQ after or before the reverb etc. I don’t know why, but reverb seems to be the hardest thing for me to understand and I wish it was not.
And then comes another big question. How much reverb should be applied to certain tracks? All decisions made during the mixing process are based on what makes me feel good. One good advice is to try monitoring your mix in mono while setting reverb levels. Usually, if I can hear a touch of it in mono it will be about right in stereo. If I get it too light in stereo, the mix will sound too dry in mono. Also – concentrate on how close or distant the reverbated track sounds in the context of the mix, not on how soft or loud the reverb is (a different perspective).
2. Creating the aux tracks including different reverb types.
3. Organizing the tracks into different coloured groups.
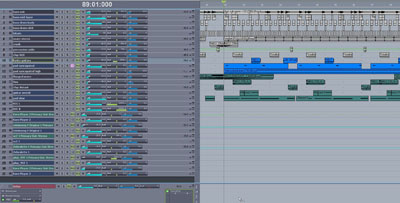
At the top of the session I have a grey coloured group – these are the instruments that I want to have really close and more or less dry: kick, bass, hihats, snare, various percussion loops. I have Room reverb going on here, but it is to be felt, not heard.
Then I have the blue group. These are the “second front” instruments with Hall or Plate type reverb on them.
And then I have the background instruments, the back wall of my mix. Everything that is here is meant to be very distant: synth texture, vocal samples and occasional piano notes.
4. Pre-delays, rolling off the top, the bottom, 300Hz and 4500 Hz.
My example configuration would look like this:
- Room: 1/64 note or 1/128 note pre-delay, HPF rolling off from 200 Hz, LPF from 9 kHz
- Plate: 1/32 note or 1/64 note pre-delay, HPF rolling off from 300 Hz, LPF from 7 kHz,
- Hall: no pre-delay, HPF rolling off from 350 Hz, lowpassing is usually quite low, in the 4k – 5k zone (remember the air absorbs high frequencies much more than it absorbs lower ones).
5. Transients
to soften the attack a little.[Example.mp3]
- Foreground: drums, percussion, bass and saxophone.
- Mid-ground: piano, acoustic guitar.
- Background: synth pad, female voice.
Summary
Some people also get nice results by playing around with Early Reflections parameter in reverb. The closer a sound source is to boundaries or large reflective objects within an acoustic, the stronger the early reflections become.
Contrast and moderation – I want you to leave with these two words and wish you all a successful experimenting!

About the author: Piotr “JazzCat” Pacyna
is a Poland based producer, who specializes in video game sound effects
and music. He has scored a number of Java games for mobile phones and, most
recently, iPhone/iPad platforms. You can license some of his tracks here.


